Boat Equipment
Traveller
What on Earth is it For?
Across the top of the Wanderers transom is a track on which runs the traveller car to which the mainsheet is attached. Control lines lead from either side of the traveller to cleats on the vertical surface of the side deck. Most of us never touch the traveller, but in certain conditions it can be very helpful. In medium winds it can simply be left amidships. Set it and forget it. But when it blows up, and also when the wind is below force 1, the traveller can be a real help.
 In a blow, there comes a point when, going to windward with both helm and crew hiking out hard, there is more power than you can handle. In passing I should mention that when the wind blows it is essential to keep both sails flat and sheeted hard, and to point as close to the wind as you can, even to the point where the inner telltales start to flicker. The closer you point, without losing drive of course, the sooner you will get where you are going. Also, the closer you point the less sideways force the wind exerts on the boat, and the easier it is to keep her upright.
But to get back to the traveller. You will already have pulled the kicker, outhaul and cunningham on hard, removed all but one small chock, and slightly raised your centreboard. But there is still too much power and you are forced to ease the mainsheet. As you ease the sheet, the sail starts to flog, the slot between main and jib is closed, and the boat starts losing speed and control. The downward tension is removed from the end of the boom, allowing it to lift, even with the kicker on hard. This causes the mainsail to lose shape and become fuller the last thing you need in a blow!
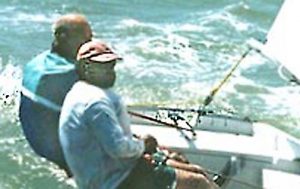
However, if you release the traveller control line on both sides and allow the traveller to slide out towards the corner of the transom, you will find you can still sheet in hard, but without pulling the boom amidships. The sail is still nice and flat just the shape you need – and because the end of the boom is off the centreline there is less sideways pressure on the boat. She will be noticeably easier to keep upright and driving. The harder it blows, the further out you should let the traveller. (I have my transom track marked at , , and of the distance from the centre on either side). No need to adjust the traveller controls on tacking, just let it slide from side to side as you tack. The picture shows Mark and myself going to windward in about force 4 at last years Whitstable Open. The traveller has been eased about one third, and the main and jib are sheeted in hard. Note the diagonal crease in the main.
In light airs the situation is reversed. To make the mainsail work well when close-hauled, the air must be able to flow smoothly off the back edge of the sail (the leech), and the upper part of the sail needs to be twisted off. But to achieve this shape, as well as letting the kicker right off, you have to ease the sheet. This lets the boom move outwards, which closes the slot between main and the jib. The jib then also has to be eased, and you can no longer sail close to the wind. This time the answer is to pull the traveller right up to windward. The mainsheet can then be eased, allowing the boom to lift while keeping it close to the centreline of the boat. The slot is restored, the top of the mainsail is twisted off, the jib can be set correctly, and you creep through the fleet in practically no wind to the amazement of all! The snag comes when you need to tack, and in these conditions good roll-tacking technique is essential. The windward traveller control must be released, and as the boat is pulled (gently) upright on the new tack, the traveller is again pulled up to windward.
It is worth noting that the traveller control cleats as supplied in earlier boats are not very easy to adjust. Porter Brothers have corrected this anomaly and have fitted easily adjustable cam cleats. Conversion is not a difficult task. It also helps to lead the lines a few feet further forward. My traveller cleats are positioned just aft of the helmsmans bottom when sitting out.
